jQuery UI DatePicker: Disable Specified Days
Written by David Walsh on Tuesday, January 26, 2010
9 Comments 3 Digg Facebook Reddit StumbleUpon S&S http://davidwalsh.name/jquery-datepicker-disable-days">Twitter PDF
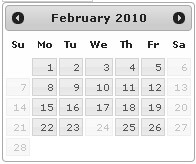
One project I’m currently working on requires jQuery. The project also features a datepicker for requesting a visit to their location. jQuery UI’s DatePicker plugin was the natural choice and it does a really nice job. One challenge I encountered was the need to prevent specific days from being picked. Here’s the jQuery javascript I used to accomplish that.
The jQuery Javascript
Click here to copy this code to the clipboardClick here to add this snippet to CodaClick here to add this snippet to TextMateGet the raw code1/* create an array of days which need to be disabled */2var disabledDays = ["2-21-2010","2-24-2010","2-27-2010","2-28-2010","3-3-2010","3-17-2010","4-2-2010","4-3-2010","4-4-2010","4-5-2010"];34/* utility functions */5function nationalDays(date) {6 var m = date.getMonth(), d = date.getDate(), y = date.getFullYear();7 //console.log('Checking (raw): ' + m + '-' + d + '-' + y);8 for (i = 0; i < disabledDays.length; i++) {9 if(ArrayContains(disabledDays,(m+1) + '-' + d + '-' + y) || new Date() > date) {10 //console.log('bad: ' + (m+1) + '-' + d + '-' + y + ' / ' + disabledDays[i]);11 return [false];12 }13 }14 //console.log('good: ' + (m+1) + '-' + d + '-' + y);15 return [true];16}17function noWeekendsOrHolidays(date) {18 var noWeekend = jQuery.datepicker.noWeekends(date);19 return noWeekend[0] ? nationalDays(date) : noWeekend;20}2122/* taken from mootools */23function ArrayIndexOf(array,item,from){24 var len = array.length;25 for (var i = (from < 0) ? Math.max(0, len + from) : from || 0; i < len; i++){26 if (array[i] === item) return i;27 }28 return -1;29}30/* taken from mootools */31function ArrayContains(array,item,from){32 return ArrayIndexOf(array,item,from) != -1;33}3435/* create datepicker */36jQuery(document).ready(function() {37 jQuery('#date').datepicker({38 minDate: new Date(2010, 0, 1),39 maxDate: new Date(2010, 5, 31),40 dateFormat: 'DD, MM, d, yy',41 constrainInput: true,42 beforeShowDay: noWeekendsOrHolidays43 });44});The base code is taken from this forum post. You’ll note that I created an array of dates in string format which also accommodates for comparing year.
I’d like to see jQuery UI implement a standard way of disabling days. Their DatePicker is very nice though so I can’t complain too much!
-->Related Posts
Follow via RSS Epic Discussion
January 26 / #
ReplyMark says:I have to admit, I wish Mootools came with such a wide variaty of UI plugins…
All and all, I think you accomplished your goal very well! Good stuff.
January 26 / #
ReplySimeon says:Nice post! Can be easily expanded by populating he “disabledDays” using PHP to find all weekends, holidays, etc. I wonder what the performance impact is though if you span across several years as a typical selection might allow?
January 26 / #
ReplySavageman says:@mark: you should try this Mootools DatePicker (also works for time): http://www.monkeyphysics.com/mootools/script/2/datepicker
Doesn’t have a beforeShowDay option though…
January 26 / #
ReplyDouglas Neiner says:I would remove all the MooTools helpers :) and just use the jQuery native $.inArray function:
Change this line: ArrayContains(disabledDays,(m+1) + ‘-’ + d + ‘-’ + y) to this instead: $.inArray(disabledDays,(m+1) + ‘-’ + d + ‘-’ + y) != -1
Then you don’t need to two other functions from MooTools.
January 26 / #
ReplyDouglas Neiner says:@Douglas Neiner: Sorry, flip the arguments. $.inArray( value, array )
ReplyDavid Walsh says:@Douglas Neiner: I’m a complete MooTools nerd — I didn’t even think to check the jQuery API. Will update.
ReplyJosh Stauffer says:Interesting dilema and solution. My problem with the jQuery Datepicker is figuring out how to store selected start and end dates in a cookie.
Be Heard!
I want to hear what you have to say! Share your comments and questions below.
Wednesday, January 27, 2010
jQuery UI DatePicker: Disable Specified Days

Silverlight Unit Testing Framework: Asynchronous Testing of Behaviors
Last month, I bogged about Unit Testing ViewModels AND Views using the Silverlight Unit Testing Framework. I wanted to take that post a step further and talk about some more advanced testing scenarios that are possible.
The site itself provides a lot of information about how to get started and what is available with the framework. One thing to keep in mind that is a radical shift from other testing frameworks is that the Silverlight testing framework runs on the UI thread. This means it does not spawn multiple threads for multiple tests and in fact requires the tests to run "one at a time" so they can take advantage of the test surface that is supplied.
This is a bit different than other frameworks but in my opinion, makes a lot of sense when dealing with Silverlight. The framework provides incredible flexibility for configuring and categorizing your tests.
If you are searching for a very comprehensive example of the framework in use, look no further than the Silverlight Toolkit. This comes with all source code and in fact uses the testing framework for its tests. You will find not only advanced scenarios for testing, but thousands upon thousands of tests! (I also am guessing that a new standard for PC performance has been invented by mistake ... let's all compile the entire toolkit and compare how long it takes!)
Tagging Tests
One thing you'll find if you run the toolkit tests is that you can enter a tag to filter tests. For example, type in "Accordion" to only run the 800 or so unit tests for accordion-type controls.
To use tag functionality, simply "tag" your test like this:
1.[TestClass]2.[Tag("MEF")]3.publicclassPartModuleTest4.{5.}I've tagged the test to be a MEF-related test. When I wire up the framework, I can filter the tag like this:
1.UnitTestSettings settings = UnitTestSystem.CreateDefaultSettings();2.settings.TagExpression ="MEF";3.this.RootVisual = UnitTestSystem.CreateTestPage(settings);When I run the tests, only my tests tagged with MEF will run! The toolkit provides an example of a UI that allows you to select the tag, then run the test.
Asynchronous Tests
It is often necessary to test methods that are asynchronous or require event coordination. An example may be a service that must wait on return values, or a user control that must be loaded into the framework before you can test it. The Silverlight Unit Testing Framework provides the
Asynchronoustag to facilitate this type of test. This tells the framework not to move onto the next test nor consider the current test method complete until an explicit call toTestCompleteis made.There are several "helper" methods supplied for asynchronous processing that we'll explore in a minute. To use these methods requires inheriting from one of the base test classes such as
SilverlightTestwhich provides the methods as well as the test surface to add controls to.In PRISM, MEF, and MVVM Part 1 of 3: Unity Glue I explored various options for binding the view model to the view. The 3rd and final method I reviewed was using an attached behavior. I would like to write some unit tests for that behavior (indeed, if I were a test-driven development or TDD purist, I would have written those tests first).
In order to test the behavior, I need to attach it to a
FrameworkElementand then validate it has done what I expected it to do. But how do I go about doing that in our unit test environment?Attached Behaviors
Similar to other controls in other frameworks, Silverlight controls have a distinct life cycle. It varies slightly depending on whether the control has been generated in XAML or through code. There is a great summary table of these events on Dave's Blog. What's important to note is that values and properties are set as soon as you, well, set them, but bindings don't take effect until they are inserted into the visual tree. In XAML, the XAML node becomes part of the tree and fires the
Loadedevent once it is fully integrated. In code, this happens after the element is added as the child of some other element that is in the tree. This allows Silverlight to parse the hierarchy and propagate dependency properties.So what we essentially want to do is take our behavior, attach it to an element, and then wait for the
Loadedevent to fire so we can inspect the element and see that it has been modified accordingly (in this case, we expect that theDataContextproperty has been set to our view model).Setting up the Project
The testing framework provides some handy templates for getting started. I add a new project and select the Silverlight Test Project template. I then add references to the projects I'll be testing and the supporting frameworks like PRISM and MEF.
Next, I'll want to build some helper classes to help me test my functionality.
Helper Classes
I like to create a folder called
Helperand place my stubs, mocks, and other helper classes there. These may be utilities, like the Exception Expected utility I use, or classes that are used for the testing framework.First, I'll create a test view model with a simple string and string collection property for testing:
01.publicclassTestViewModel02.{03.publicTestViewModel()04.{05.ListOfItems =newList<string>();06.}07.08.publicTestViewModel(List<string> items)09.{10.ListOfItems = items;11.}12.13.publicstringProperty {get;set; }14.15.publicList<string> ListOfItems {get;set; }16.}If my view models have common methods described in a base class or interface, I might use a mocking framework to mock the class instead.
The Test Class
The behavior I created has an affinity to the Unity inversion of control (IoC) container. It could be refactored otherwise, but it made sense for the sake of the demonstration. Therefore, I'll need to have a container for testing, as well as the view model. My test class starts out looking like this (notice I base it on
SilverlightTest):01.[TestClass]02.publicclassViewModelBehaviorTest : SilverlightTest03.{04.conststringTESTPROP ="Test Property";05.06.IUnityContainer _container;07.08.TestViewModel _viewModel;09.10.[ClassInitialize]11.publicvoidClassInitialize()12.{13._container =newUnityContainer();14.15._viewModel =newTestViewModel() { Property = TESTPROP };16._container.RegisterInstance<TestViewModel>(_viewModel);17.18.ViewModelBehavior.Container = _container;19.}20.}I create a reference to the entire test class for the container and the test view model. When the class is initialized (this is one-time setup, before all tests are run) I create a container, a view model, and tell the container that anytime someone asks for the view model, give them the specific instance I created. I also set the container on the type for the view model behavior class, so it knows what to use when resolving the view model.
The Code Behind Test
For my first test, I'll programmatically attach the behavior and test that it works. The view model behavior takes in a string that is the fully qualified type name for the view model, and then uses the unity container to resolve it. Therefore, my test looks like this:
01.[TestMethod]02.[Asynchronous]03.[Description("Test creating an element and attaching in code behind.")]04.publicvoidTestAttach()05.{06.TextBlock textBlock =newTextBlock();07.textBlock.SetValue(ViewModelBehavior.ViewModelProperty,typeof(TestViewModel).AssemblyQualifiedName);08.09.textBlock.Loaded += (o, e) =>10.{11.Assert.IsNotNull(textBlock.DataContext,"The data context was never bound.");12.Assert.AreSame(textBlock.DataContext, _viewModel,"The data context was not bound to the correct view model.");13.14.EnqueueTestComplete();15.};16.17.TestPanel.Children.Add(textBlock);18.}There's a few things going on here, so let's break them down!
The
TestMethodattribute tags this method to be run by the framework. It is decorated with a description, which I can view on the output when the test is run and helps make the test more, ah, descriptive. The first thing I do is create a test block and attach the view model property. Here, I'm taking the test view model and getting the fully qualified name and using that to set the attached property. We want to make sure everything works fine and there are no errors during binding, so this is where the asynchronous pieces come into play.The
Asynchronoustag tells the framework that we're waiting on events, so don't consider this test complete until we explicitly tell the framework it's complete. When the text block fires theLoadedevent, we confirm that the data context is not null and that it in fact contains the exact instance of the view model we created in the class initialization. Then we tell the framework the test is complete by callingEnqueueTestComplete, which is provided by the base class.Finally, if you were to run this without the last line, the test would stall because the text block would never get loaded. We add it as a child of the test surface, and this injects it into the visual tree and fires the loaded event.
The XAML Test
I'm not completely confident with this test because the whole reason for creating a behavior was so I could attach the view model in XAML and not use code behind. Therefore, I should really test attaching this behavior through XAML. So, at the top of the test class we'll create the necessary XAML and wrap it in a
UserControl:01.conststringTESTXAML =02."<UserControl "+03."xmlns=\"http://schemas.microsoft.com/winfx/2006/xaml/presentation\" "+04."xmlns:x=\"http://schemas.microsoft.com/winfx/2006/xaml\" "+05."xmlns:vm=\"clr-namespace:PRISMMEF.Common.Behavior;assembly=PRISMMEF.Common\">"+06."<Grid x:Name=\"LayoutRoot\" Background=\"White\" "+07."vm:ViewModelBehavior.ViewModel=\"PRISMMEF.Tests.Helper.TestViewModel, PRISMMEF.Tests, Version=1.0.0.0\">"+08."<ListBox x:Name=\"ListBox\" ItemsSource=\"{Binding ListOfItems}\"/>"+09."</Grid></UserControl>";If you think the constant is ugly, you can always add an actual XAML file, set it as an embedded resource, then read it in instead. That would give you the full functionality of the editor to tweak the test code. Here, we simply create a control with a grid and a list box. The list box uses the attached behavior and also binds the list.
I want to test the list binding as well, so I add a collection to my test class:
1..2.privatestaticreadonlyList<string> _testCollection =newList<string> {"test1","test2"};3..In the class initialize method, I'll pass this into the view model's constructor so it is set on the
ListOfItemsproperty.Now, we can create the control from XAML, load it, and test it:
01.[TestMethod]02.[Asynchronous]03.[Description("Test creating from XAML")]04.publicvoidTestFromXaml()05.{06.UserControl control = XamlReader.Load(TESTXAML)asUserControl;07.08.control.Loaded += (o, e) =>09.{10.ListBox listBox = control.FindName("ListBox")asListBox;11.12.Assert.IsNotNull(listBox,"ListBox was not found.");13.Assert.IsNotNull(listBox.DataContext,"The data context was never bound.");14.Assert.AreSame(listBox.DataContext, _viewModel,"The data context was not bound to the correct view model.");15.16.IEnumerable<string> list = listBox.ItemsSourceasIEnumerable<string>;17.List<string> targetList =newList<string>(list);18.CollectionAssert.AreEquivalent(targetList, _testCollection,"Collection not properly bound.");19.20.EnqueueTestComplete();21.};22.23.TestPanel.Children.Add(control);24.}Now we load the control from XAML and wire in the
Loadedevent to test for the data context and the instance. Then, I take the items from the list box itself and compare them with the original list usingCollectionAssert. TheAreEquivalentdoes a set comparison. Then we signal the test is complete.There's no code for this example because it was very straightforward and I'll likely be posting a more comprehensive example in the future as the result of a talk I'll be giving. Be sure to tune into MSDN's geekSpeak on Wednesday, February 17th, 2010 when I will be the guest to cover exclusively the topic of the Silverlight Unit Testing Framework (the talks are all stored on the site in case you read this after the event).
Thanks!
Unit Tests for ViewModels AND Views in Silverlight
Over the past few posts I've been exploring models for modularized Silverlight applications that follow the MVVM pattern (using Prism/CAL). In this post, I'd like to cover unit testing, and writing appropriate tests not just for the view model, but the view itself.
Before we continue, I'm going to assume you've read:
- Dynamic Module Loading with Silverlight Navigation using Prism
- MVVM Composition in Silverlight
- Simplifying Asynchronous Calls in Silverlight using Action
These articles form the core of what I'm about to discuss. I also want to make sure you're familiar with the Silverlight unit testing framework. You can download it and review some articles about how to use it over at the Unit Test Framework for Microsoft Silverlight page. I highly recommend pulling down the project and class templates as they will make your life easier!
The testing framework for Silverlight sets up a project that you run, and that project will then create a visual page that displays the results of tests. What's important is that the test framework will not only support class tests, but can also host controls and test the hosted controls as well. Do we even want to do this? I think so.
Set up your test project and make it the runnable one by adding a new project to your existing Silverlight solution, using the Silverlight project template, then right-clicking on the project and setting it as the start-up project.
Let's get started with a real example. I want to control the visibility of a control based on a boolean value in the view model, so I create a converter that takes in a boolean and returns visibility. I can bind the visibility like this:
1.<TextBlockText="Conditional Text"Visibility="{Binding ConditionFlag,Converter={StaticResource BoolVisibilityConverter}}">The code for the converter is simple:
1.publicobjectConvert(objectvalue, Type targetType,objectparameter, System.Globalization.CultureInfo culture)2.{3.return(bool)value ? Visibility.Visible : Visibility.Collapsed;4.}To test that we get what we want, simply add a new class in your test project (use the Silverlight Test Class template). With a little bit of typing you will end up with something like this:
01.[TestClass]02.publicclassBoolVisibilityConverterTest03.{04.BoolVisibilityConverter _target;05.06.[TestInitialize]07.publicvoidInitialize()08.{09._target =newBoolVisibilityConverter();10.}11.12.[TestMethod]13.publicvoidTestTrue()14.{15.objectresult = _target.Convert(true,typeof(bool),null, CultureInfo.CurrentCulture);16.Assert.IsNotNull(result,"Converter returned null.");17.Assert.AreEqual(Visibility.Visible, result,"Converter returned invalid result.");18.}19.20.[TestMethod]21.publicvoidTestFalseNoParameter()22.{23.objectresult = _target.Convert(false,typeof(bool),null, CultureInfo.CurrentCulture);24.Assert.IsNotNull(result,"Converter returned null.");25.Assert.AreEqual(Visibility.Collapsed, result,"Converter returned invalid result.");26.}27.}Not rocket science there ... but it's nice to start out with a few green lights. When you run it, you'll see that your two tests passed and all is well (you can, of course, assert something invalid to see what a failure looks like).
Now let's test a view model. Our view model takes in a
IServicereference so that it can log a user in. It has bindings for username and password and a login command. The service looks like this:So the view model looks like this:1.publicinterfaceIService2.{3.voidLogin(stringusername,stringpassword, Action<bool> result);4.}001.publicclassViewModel : INotifyPropertyChanged002.{003.privateIService _service;004.005.publicViewModel(IService service)006.{007._service = service;008.009.LoginCommand =newDelegateCommand<object>( o=>CommandLogin );010.}011.012.privatebool_isDirty;013.014.publicboolIsDirty015.{016.get{return_isDirty; }017.}018.019.privatestring_username, _password;020.021.publicstringUsername022.{023.get{return_username; }024.set025.{026.if(value !=null&& !value.Equals(_username))027.{028._username = value;029.OnPropertyChanged("UserName");030.}031.}032.}033.034.publicstringPassword035.{036.get{return_password; }037.set038.{039.if(value !=null&& !value.Equals(_password))040.{041._password = value;042.OnPropertyChanged("Password");043.}044.}045.}046.047.publicDelegateCommand<object> LoginCommand {get;set; }048.049.publicvoidCommandLogin()050.{051.if(string.IsNullOrEmpty(_username))052.{053.thrownewValidationException("Username is required.");054.}055.056.if(string.IsNullOrEmpty(_password))057.{058.thrownewValidationException("Password is required.");059.}060.061._service.Login(_username, _password, (result) =>062.{063.if(result)064.{065.// logic to navigate to a new page066.}067.else068.{069.thrownewValidationException("The username/password combination is invalid.");070.}071.});072.}073.074.protectedvoidOnPropertyChanged(stringproperty)075.{076.PropertyChangedEventHandler handler = PropertyChanged;077.if(handler !=null)078.{079.handler(this,newPropertyChangedEventArgs(property));080.}081.if(!_isDirty)082.{083._isDirty =true;084.if(handler !=null)085.{086.handler(this,newPropertyChangedEventArgs("IsDirty"));087.}088.}089.}090.091.publicvoidResetDirtyFlag()092.{093.if(_isDirty)094.{095._isDirty =false;096.PropertyChangedEventHandler handler = PropertyChanged;097.if(handler !=null)098.{099.handler(this,newPropertyChangedEventArgs("IsDirty"));100.}101.}102.}103.}Notice how properties being set should automatically set the "dirty" flag as well. I may want to bind my login button to the flag so it only becomes available when the user has changed something, for example. There is also a public method to reset the flag.
In order to satisfy my service, I'll create a "mock" object. Why a mock, and not a stub? A stub is a piece of code you put in place to allow something to happen. If I wanted to stub my service, I'd do this:
1.publicclassServiceStub : IService2.{3.publicvoidLogin(stringusername,stringpassword, Action<bool> result)4.{5.result(true);6.}7.}This would always call back with a valid user and stubs out the functionality so I don't have to implement a real login. A mock object, on the other hand, changes. To make this a mock, I do this:
01.publicclassServiceMock : IService02.{03.publicboolLoginCalled {get;set; }04.05.publicvoidLogin(stringusername,stringpassword, Action<bool> result)06.{07.LoginCalled =true;08.result(true);09.}10.11.}The class is a mock because it changes based on how it is used, and then we can query that change to see if our code is doing what we want. So let's set up some tests with the view model:
01.[TestClass]02.publicclassViewModelTest03.{04.05.privateViewModel _target;06.privateServiceMock _service;07.08.[TestInitialize]09.publicvoidInitialize()10.{11._service =newServiceMock();12._target =newViewModel(_service);13.14.}15.16.[TestMethod]17.publicvoidTestConstructor()18.{19.Assert.IsFalse(_target.IsDirty,"Dirty flag should not be set.");20.Assert.IsFalse(_service.LoginCalled,"Login should not have been called.");21.Assert.IsNotNull(_service.LoginCommand,"Login command was not set up.");22.}23.}You can test that the username hasn't been populated, for example. Now we can do a little more. In the example, we throw a
ValidationException(a custom class) when the username is invalid. The Silverlight 3 validation framework can capture this based on data binding and show appropriate error messages to the client. We want to make sure if we try to login, we throw the exception, so we can do this:1.[TestMethod]2.[ExpectedException(typeof(ValidationException))]3.publicvoidTestLoginValidation()4.{5._target.CommandLogin();6.}Here we call the login command on the empty object and it should throw (and catch) the exception we're looking for.
Finally, to use our mock object, we can set a valid user name and password and call the login command, then verify that the mock object was called:
01.[TestMethod]02.publicvoidTestLogin()03.{04._target.Username ="Valid Username";05.06.//bonus test: check that the dirty flag got set07.Assert.IsTrue(_target.IsDirty,"Dirty flag was not set on update.");08.09._target.Password ="Password";10._target.CommandLogin();11.12.Assert.IsTrue(_service.LoginCalled);13.}After testing your view model, you can then begin to work on testing the view itself. In the "required reading" I discussed having a generic view base that would interact with a navigation manager to swap views into and out of view. The views are all contained in an
ItemsControl, and register to a view change event. If the view goes out of focus, it moves to a hidden state. If the view comes into focus, it moves to a visible state. While this allows more control over the way the states appear and how to transition between states, there is also the chance someone may add a view and forget wire in the visual state groups. TheVisualStateManagerwon't complain, but it can look ugly. We need to test for things like this!Fortunately, the testing framework allows for us to host actual views. It provides a testing surface that we add controls to, and those controls are rendered so you can then inspect the visual tree. In this case, we want to emulate a view navigating to a new view and test that it is moved to the correct state.
Create a new test class. This time, however, we will inherit from the base class
SilverlightTestwhich provides our class with a test panel to host controls on. The set up is a bit more involved, because we need to fold the mock services into the view model, then create the view and glue it all together.Before we do this, we'll create a helper class called
QueryableVisualStateManager. This class is one I borrowed from Justin Angel's fantastic blog post about Custom Visual State Managers. In his post, he details how to create a custom visual state manager that holds a dictionary of the control states so they can be queried later on (in case you've been pulling your hair out in frustration, the framework does not provide direct access to query the current visual state of controls).I created the class verbatim, but don't care to use it in production code. Instead, we'll inject it in our test class. Here's the setup:
01.[TestClass]02.publicclassLoginTest : SilverlightTest03.{04.privateLogin _login;05.privateViewModel _viewModel;06.privateServiceMock _service;07.privateNavigationManager _navigationManager;08.privateQueryableVisualStateManager _customStateManager;09.10.[TestInitialize]11.publicvoidTestInitialize()12.{13._login =newLogin();14.15.FrameworkElement root = VisualTreeHelper.GetChild(_login, 0)asFrameworkElement;16.root.SetValue(VisualStateManager.CustomVisualStateManagerProperty,newQueryableVisualStateManager());17.18._service =newServiceMock();19._navigationManager =newNavigationManager();20._viewModel =newViewModel(_service);21._viewModel.Navigation = _navigationManager;22._login.DataContext = _viewModel;23.TestPanel.Children.Add(_login);24.}25.}What happened?
Loginis my user control ... it is the view I inject into the shell to show the login page. Here I create an instance of it. Then, I use my friend theVisualTreeHelperto parse the the first child, which is going to be the grid or stack panel or whatever "host" control you have inside your user control. Then, I simply set the attached property for the custom view manager to point to the queryable helper class. This will ensure any visual state transitions are recorded in the internal dictionary. Then I wire up my mocks, databind, and finally add the login control to theTestPanel. It now gets hosted on a real test surface and can initialize and display.Let's assume that the navigation manager I injected is responsible for swapping the view state of the control. The control goes into a
HideStatewhen not visible and aShowStatewhen visible. What I want to test is a simulated login command. We already tested this in the view model, so we can be confident it is going to hit the service and do what it is supposed to do. There is a piece of code that then calls the navigation manager and changes the control's state to hidden. We want to test that this hook actually gets fired when the user clicks login, so the login view disappears. Here's how:01.[TestMethod]02.publicvoidTestLogin()03.{04.conststringSHOWSTATE ="VisualStates.ShowState";05.conststringHIDESTATE ="VisualStates.HideState";06.07.// set up this view08._navigationManager.NavigateToPage(NavigationManager.NavigationPage.Login);09.10.stringstate = QueryableVisualStateManager.QueryState(_login);11.Assert.IsTrue(state.Contains(SHOWSTATE) && !state.Contains(HIDESTATE),"Invalid visual state.");12.13.// trigger login14._viewModel.Username ="user";15._viewModel.Password ="password";16._viewModel.CommandLogin();17.18.state = QueryableVisualStateManager.QueryState(_login);19.Assert.IsTrue(state.Contains(HIDESTATE) && !state.Contains(SHOWSTATE),"Invalid visual state.");20.}We first test the pre-condition by navigating to the login page and confirming it has the
ShowStateand not theHideState. Then, we simulate a login action (this is why command binding and view models are so powerful) and query the state again, testing to make sure we went into a hidden state.When you run this test, you might actually see the control flicker for a moment on the screen as it gets initialized on the test surface before it is manipulated and then discarded for other tests. With the right architecture, you are now able to test from the view down to the backend services that drive your application. Now that's powerful!